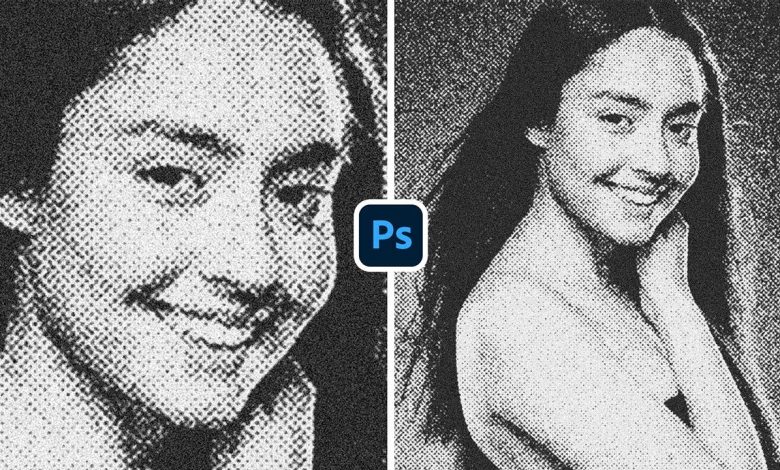
Today I’m going to share with you how to create an incredible half tone effect with a bit of grunch in Photoshop now since each photo is different there’s got to be different settings for each photo right so we need to understand how each one of these settings and features
Work and what they do so that you become the master so that you can apply to your best and you don’t become a mere step follower so without any further Ado let’s get started back at the magical world of Photoshop and the first thing we need to do is to select the
Background lay and press control or command J and make a duplicate of it if you want to follow along with this photo you know what to do check the links in the description now let’s go to filter conect invert for smart filter so that whatever filter we apply we can change
The values later it’s very important because sometimes we can change our minds let’s go to filter and we’ll do most of our stuff inside of filter Gallery let us choose filter Gallery most of the filters we’re going to be working with is inside of sketch so
Let’s open that up and the first one that we’re going to apply is reticulation now it may look completely different for you and there’s a reason for it first of all hit cancel if your foreground and background color is not set to defaults weird things can happen
So let’s reverse it by pressing X and change this one possibly to bright red now when you go to filter filter gallery and apply the same reticulation have a look at it it’s just crazy it’s applying the red and the black so that is why before applying filter Gallery press D
To set the foreground and background color to defaults let’s go to filter filter Gallery let’s apply reticulation now the best way to understand it is simply playing with these sliders I recommend decreasing the density all the way to the left hand side decrease everything all the way to the left hand
Side now what was in the foreground color do you remember it was black right so this controls the black levels the more you increase it the more the blacks will increase in the image so I don’t want it too much I don’t want to lose a
Lot of details in the hair so let’s go for about maybe five and now as the name suggests what was the background color it was white right so as you do increase it it controls how much white or how much brightness there is so the more you
Increase it the more details we lose in the highlights so let’s decrease it I’m going to keep it at about let’s go for three or four that’s nice we can lose this amount of detail now it completely depends on the kind of style that you are going for feel free to experiment
With this after you’re happy with this let’s blend it all with grain and here’s where density comes into play this is too less increase it to about not too much let’s go for about seven so there you have it so this creates a nice base for us to create the half tone effect
And then when you zoom in it does lack fine grain and also when you apply the halft tone effect it creates a lot of contrast so we need to add some fine grain and make it a bit faded for it we need to add some film grain so film
Grain is something you’ll find inside of artistic so open that up if it’s not already open and you can click on film grain but if you do that the previous filter will change to film grain so let’s go back by pressing control or command Z or Z however you pronounce it
And on top of it click on this plus button yes you can stack filters and change this one to film graen grain right here but there’s way too little grain and we cannot even see it so for this one I recommend increasing the grain to a very high amount and then
Decreasing the Highlight area and the intensity all the way to the left hand side so now you can play with it and see what they do visually so maybe we’ll keep it high all the way high love the highlights there and the Highlight area just blows up the Highlight so we don’t
Want that let’s decrease it all the way to the left and the grain is of course too much let’s decrease it we don’t want a lot maybe this is fine as a nice base now I think we’re ready to apply the half tone effect and for it do not
Forget click on the plus right here otherwise this will change let’s scroll down as I told you most of what we going to apply is inside of sketch right here you’ll find half tone pattern let’s pick that and there you go I’m just kidding
It’s not at all close to what we want to do now in here you can choose all different kinds of patterns like dot line I love this like currency notes right some of it Circle as well some of them this is fine let’s go with Dot and now you can
Control the size of those halone patterns so this can be way too big or way too small so we’re going to keep it at about three three is kind of nice and then we can control the contrast let’s go for somewhere around 11 this is nice now after this you can
Apply film grain and stop right there if you’re going for a pure half tone pattern but if you want to go towards the grungier side of things on top click on the plus let’s apply something called Torn edges now again this is way too much contrast I recommend keeping image
Balance in the middle for now and decrease the smoothness and the contrast all the way to the left and now slowly and gradually work with the contrast and see what works for you too much contrast again will make you lose a lot of details so find a sweet spot right here
Eight is fine and then increase the smoothness now smoothness in this case does opposite of what it looks like it would do it just makes things sharper in this case so the more the smoothness the more Dawn you’ll clearly see so at about
11 12 13 is fine so let’s keep it 12 and the image balance is simply the balance between highlights and shadows so right here we have more highlights and less shadows and we have more shadows and less highlights let’s keep it somewhere around the middle at about 27 that’s
Fine but it’s still not complete I know it looks great still not complete the darks are completely black and the highlights are completely white so why not add some grain so let’s click on the plus right here and let’s add one more film grain and again I would recommend
Increase the Grain and decrease both of these values and slowly and gradually increase them so I’m going to set the intensity to about let’s keep it low this time the Highlight area is just decreasing the dimension so we’re going to keep it all the way to the left and
Control the green not too much green so about seven is fine and then control the Highlight area is it doing a lot no we’re going to keep it all the way to the left hand side and intensity let’s keep it at one so that we have green in
The absolute highlight areas as well and it looks pretty good to me it okay and there you go ready at this point I would highly recommend that you go ahead and take a break have a cup of coffee tea water snacks whatever you like and then
Get back to it and look at it with fresh eyes you may want to alter some settings here and there now while you’re taking that break I wanted to let you know that I’m doing a complete two-day full day Photoshop Workshop in Colorado Springs Hands-On with you in person so the first
Day the full day we’re going to look at the fundamentals of Photoshop if you know nothing about Photoshop or if you’re a beginner or even if you are an intermediate by the end of the first day you’ll know your way around Photoshop it will become very familiar to you no more
Scary and you’ll actually start incorporating it in your professional workflow on day two we’re going to look at more advanced techniques for photographers like retouching compositing color gring everything in depth it’s going to be two complete full days we’re going to go in depth we’re going to do it Hands-On we’re going to
Do it live and in person you’ll have a lot of fun so if you’re interested in joining please check the link in the description so after you have taken a break and given me a break you can always double click on filter gallery go back to all of those settings and you
Can change whatever you want let’s say you want to go to halftone pattern and you want to increase the size maybe from 3 to four or you want to decrease the size to maybe two you can do that I actually like three I’m going to go with
That hit okay now what if you wanted to apply the same effect to a different photo without going through the whole thing well you can either create an action or just copy this layer select this layer press control or command command C go to another image press
Control or command V it really doesn’t matter where it lands select the main background lb press control or command J go to filter convert for smart filters hit okay and simply hold the ALT key or the option key click and drag and drop the smart filter from the layer where it
Is already applied to this new layer just release it done let’s turn it off or even delete it there you go applied now of course the same settings would not work we need to work with the highlights and shadows so let’s open this up up click on this Arrow to
Uncollapse it double click on filter gallery and from here you can always play with for example reticulation maybe change the full ground level decrease it a bit there you go it’s more apt let’s keep it one maybe then go to torn edges and decrease the contrast see what that
Does that makes it better then maybe go to half tone pattern increase the size to about four that is better for this image see how easy it is to copy smart filters alternatively you can also create an action let’s go to window actions inside of actions let’s create a
New set by clicking on this button let’s name it half tone inside of that let’s create a new action click on this one Effect one click on record and do the things you would normally do I would create a new layer right here and then press control alt shift and E so that
Even if you have a lot of layers and adjustment layer maybe this action would work then we’re going to go to filter convert for smart filters hit okay then we’ll go to filter filter gallery there you go it’s already applied it simply applies the last sequence hit okay and
You can name the current layer to half tone there you go stop the action done now when you open up any image just open up your actions just play H Effect one this one let’s play it and there you go it automatically does it now of course
You would have to go to filter Gallery let’s double click on it and change the settings according to your style now on top of this we can always do some extra stuff like bringing in a texture let’s go to our finder or Explorer and I’m just going to drag and drop this texture
Right here by the way I got it from envato elements I highly recommend envato elements for all kinds of creative assets for a fixed fee you get unlimited stuff hit enter or return and simply change the blend mode from normal to Overlay let’s try softlight see what
They do let’s keep it at soft light and here you have some grunge here’s the before here’s the after of course you can move it press control or command D I’m going to place it right here and make it larger like this stretch it a
Bit so that towards the face we have a bit of brightness and of course if you feel it is too much you can decrease the opacity let’s keep it at about 60% on top of this we can also create a gradient so choose the gradient tool right here choose a gradient from white
To black and simply draw in a gradient you can create a radial gradient like this a linear gradient like this let us choose a radial let’s keep it this way and change the blend mode from normal to screen now of course this is way too much we wanted to apply it very slightly
So let’s let’s take it up like this and then stretch it there you go we wanted something like this let’s take it even further smooth now that looks like something and again this is too much let’s decrease the opacity at about 50% is fine now it’s up to you you can keep
It without these with these your call now here’s a bonus preview if you are in Photoshop beta you may come across something like parametric filters brand new filters in Photoshop just go to filter here you’ll find barometric filters and you have lots of filters like oil
Painting this is pretty good but not so good as well and again you have parametric properties where you can change the effect intensity the F details all the properties of that particular filter but the important thing here is that you also have half tone let’s click on that and that is
Also one of the ways you can apply it you have different presets for it orange and purple you have black and white dots cont contrast Dot and here of course you can play with the size the color options and the contrast and the brightness but I didn’t show this because it’s still in
Beta we don’t know whether it will make it to the main version and if it does how it will be then and also we can still do a lot more with the old school filter Gallery so that’s how to create the half tone effect with a bit of
Crunch in Photoshop there’s no hard and fast ruol on how to do it there are a couple of thousands of ways to do it but do keep in mind it is just a series of filters and there is no right or wrongs the important fil filters are the half
Tone filter whatever you apply before it or after it it is just something for your personal taste and stylization and just for your reference and just for you to enjoy I’m also putting the action we just created in the description so you can download and reference it if you
Want do whatever you want I hope you enjoyed this video and if you did make sure to give us a like and also don’t forget to subscribe and not just subscribe bring the Bell so that you my friend don’t miss any other future tips tricks or tutorials I would like to take
This moment to thank all of these nice and amazing people for supporting pixm perfect on Pon and helping keep pix in perfect free for everybody forever thank you so much for watching I’ll see you in my next one till then stay tuned and make sure that you keep creating don’t
Make me dance to a tone that you’re huming no my body don’t move like that don’t make me pretend I don’t see a coming you’ll be running when I raise the Black Flag
#Create #Dotted #Halftone #Effect #Free #Photoshop #Action
For More Interesting Article Visit : https://mycyberbase.com/

